In the ever-evolving world of digital marketing, Google Tag Manager (GTM) has risen as a game-changer for webmasters, marketers, and developers alike. This potent platform transforms the way you deploy marketing tags across your website. Gone are the days of sifting through code line by line. With GTM, you can streamline the process, allowing for quick updates and more precise control over your site’s tracking and analytics as your business scales.
At ‘corePHP’, we see GTM as more than just a handy tool—it’s a powerhouse that brings meticulous control, boosts your site’s performance, and might even enhance your SEO by aligning more closely with Google’s preferences. Join us as we dive deep into the essentials of GTM. We’ll cover everything from basic setup to advanced strategies for leveraging this tool to refine your analytics and potentially improve your site’s ranking. Let’s unlock the full potential of GTM together.
Why Google Tag Manager is Essential in 2025
In 2024, now into 2025 efficiency and speed often dictate the success of your online presence. Google Tag Manager (GTM) is an indispensable tool for anyone looking to enhance their website’s functionality without getting bogged down by technical complexities. Let’s explore how this powerful tool can transform your digital strategy, making your operations smoother and more responsive.
Streamlines Tag Management: Navigating website tags doesn’t have to be complex or technical. Typically, adding tracking tags for tools like Google Analytics, conversion codes for Google Ads, and Facebook Pixels would require diving into the HTML abyss and manually embedding each script. This old-school method isn’t just slow; it’s ripe for mistakes. Enter Google Tag Manager (GTM)—your central command for tags. It’s designed so that even those without a coding background can easily manage their website’s tags through a straightforward, intuitive interface. Add, remove, or update tags across your site quickly without touching a code line.
Boosts Site Performance: Speed is everything in the online world. Manually managing tags can clutter your website’s code with extra scripts, slowing down page load times—a surefire way to frustrate visitors. GTM offers a slick solution by enabling your tags to load asynchronously. This means they load independently without interfering with other elements, thus speeding up the overall experience for your users.
Empowers Faster Marketing Deployments: In today’s rapid marketing landscape, waiting on technical support to insert or update tags can bottleneck your campaigns. GTM empowers your marketing team by putting the control directly in their hands. They can quickly deploy and modify tags on the fly, ensuring campaigns launch on schedule without being tied down by development timelines.
How to Leverage Google Tag Manager for Analytics Tracking
Now that we understand why GTM is essential, let’s explore how to properly leverage it to set up triggers and events for analytics tracking. We’ll walk you through the process step-by-step.
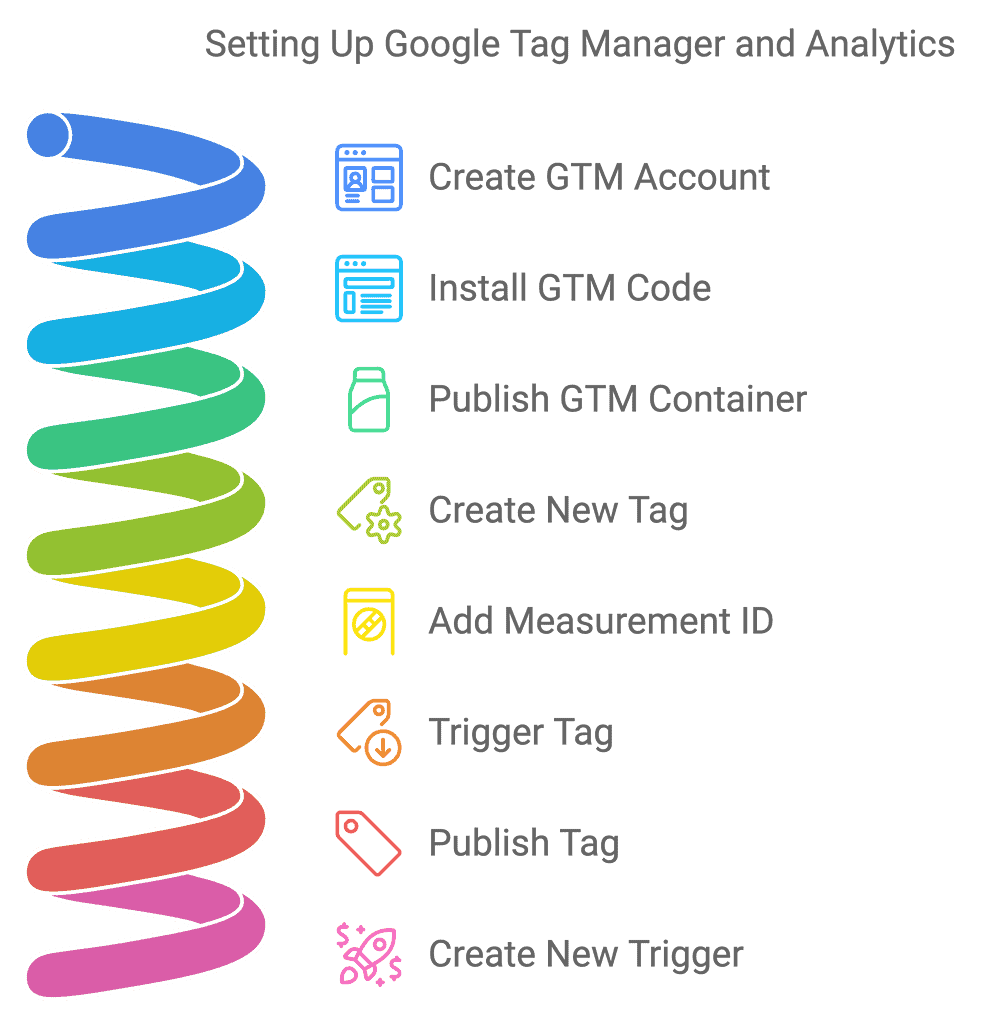
Setting Up Google Tag Manager
- Create a GTM Account: Go to Google Tag Manager and click “Start for free.” Create your account, providing your business name and the container’s URL (the website you want to track).
- Install the GTM Code: GTM will provide two code snippets once your container is created. You must add these snippets to your website’s code: one in the <head> section and the other in the <body> section. For WordPress users, there are plugins available that simplify this process.
- Publish Your Container: After installation, publish your container. This activates GTM on your site and allows you to start deploying tags and tracking user behavior.
Setting Up Google Analytics with GTM
We need to configure GTM to send data to your Analytics account to track user behavior through Google Analytics.
- Create a New Tag: In your GTM dashboard, click “Tags” > “New” > “Google Analytics: GA4 Configuration.”
- Add Your Measurement ID: You’ll need your GA4 Measurement ID, which can be found in your Google Analytics property under Admin > Data Streams > Web. Copy and paste this ID into GTM.
- Trigger Your Tag: We need to specify when the tag should fire. Select “All Pages” as the trigger to send pageview data to Google Analytics for every page on your site.
- Publish Your Tag: Once everything is set up, click “Submit” in GTM to publish the tag. Google Analytics will now start receiving data from your site.
Setting Up Custom Events
Google Tag Manager’s real power lies in tracking custom events, such as clicks, form submissions, or specific interactions that are important for your business.
Example: Tracking Button Clicks
- Create a New Trigger: In GTM, go to Triggers > New > Click – All Elements.
- Configure Your Trigger: Name your trigger “Button Click,” and select conditions such as “Click Text equals [Button Text]” or “Click ID equals [Button ID].” This ensures that only specific button clicks will trigger the event.
- Set Up the Tag: Create a new tag that sends this event to Google Analytics. Select “GA4 Event” and enter the event name, such as “Button Click.”
- Test Your Tag: GTM offers a built-in preview mode for testing whether your tags are firing correctly. Use this mode to test your button-click event before publishing.
- Analyze Event Data in Google Analytics: After publishing the tag, go to your Google Analytics dashboard, where you can view detailed data on your new custom event.
Our Take: GTM Improves Control, Performance, and Potentially SEO
At ‘corePHP,’ we’ve seen firsthand the significant advantages of using Google Tag Manager in terms of ease of implementation and improved performance and control. Here’s why we think GTM plays a crucial role beyond just managing tags:
Provides Unmatched Control
With GTM, you can define exactly what interactions you want to track and when those triggers should fire. This means you can create a granular tracking strategy that only captures data relevant to your business goals. For example, you could set up tracking for:
- Video plays on key product pages.
- Scroll depth on long-form landing pages.
- Interaction with downloadable assets like e-books or guides.
Having this level of control ensures you’re gathering the most insightful data possible, which allows for more data-driven marketing decisions.
Enhances Website Performance
Performance is critical to a great user experience, and as we’ve discussed, GTM helps improve performance by loading tags asynchronously. This means the tags don’t block the rest of your page content from loading, resulting in faster page load times. In today’s competitive digital space, faster page load times can influence conversion rates and reduce bounce rates.
Potential SEO Impact
Although Google hasn’t officially confirmed it, having a well-implemented GTM setup could positively affect your site’s SEO efforts. Here’s why:
- Google Loves Efficiency: Google’s algorithm is designed to favor websites that offer a seamless user experience. By improving page load speeds and reducing the number of external resources called, GTM indirectly contributes to better user experience—something that we know Google values.
- Data-Driven Decisions: The more efficiently you can track user behavior, the better decisions you can make to optimize your content, design, and performance. Google rewards sites that continually improve and provide value to users.
- Technical Best Practices: An adequately configured GTM setup may signal to Google that your website follows best practices regarding technical SEO. While GTM is not a ranking factor, it shows that you’re implementing cutting-edge solutions that enhance site performance and user experience.

While we don’t suggest implementing GTM guarantees SEO improvements, it aligns with Google’s emphasis on efficient, well-managed websites.
Practical Tips for GTM Success
Here are a few practical tips to get the most out of Google Tag Manager:
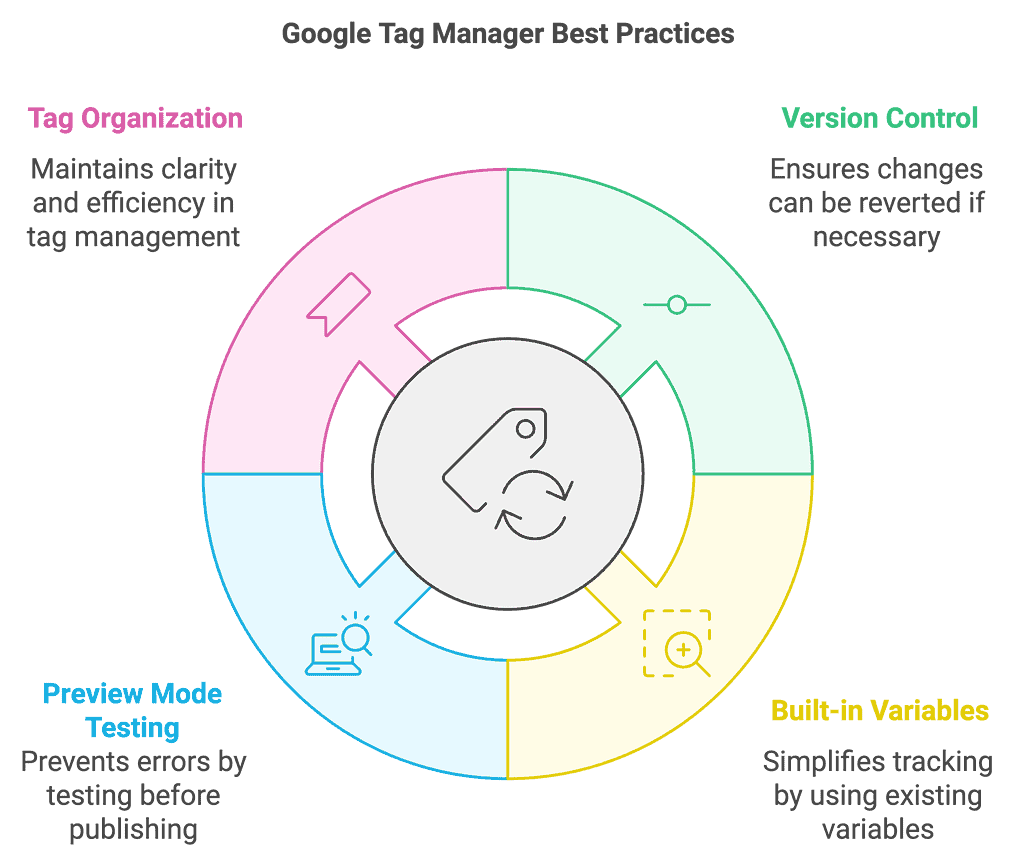
- Use Version Control: GTM allows you to create versions of your container. You can always roll back to a previous version if you make changes that don’t work as expected.
- Leverage GTM’s Built-in Variables: GTM has many built-in variables, such as Page URL, Click ID, and Form Class, which can help simplify tracking setups. Always check if there’s a built-in variable before creating a custom one.
- Test in Preview Mode: Always use GTM’s Preview Mode before publishing any new tags or triggers. This will save you headaches from potential mistakes or misfires.
- Keep Tags Organized: Name your tags, triggers, and variables. As your site grows and you implement more tags, keeping things organized will save you time and confusion later.
Google Tag Manager is a powerful, versatile tool that simplifies tag management, enhances website performance, and offers granular control over your tracking strategy. At ‘corePHP,’ we believe that mastering GTM helps streamline marketing efforts and positions your site for potential SEO benefits. While it’s not an official ranking signal, having a clean, efficient tag setup is something Google’s algorithm likely appreciates, especially as it evolves to reward better user experiences.
By effectively leveraging GTM, you can precisely track, analyze, and optimize your website’s performance, empowering your business to make data-driven decisions that fuel growth.
Let us know how ‘corePHP’ can assist you in setting up or optimizing your Google Tag Manager configuration for maximum impact.